¶ What is InstaLOD Pipeline?
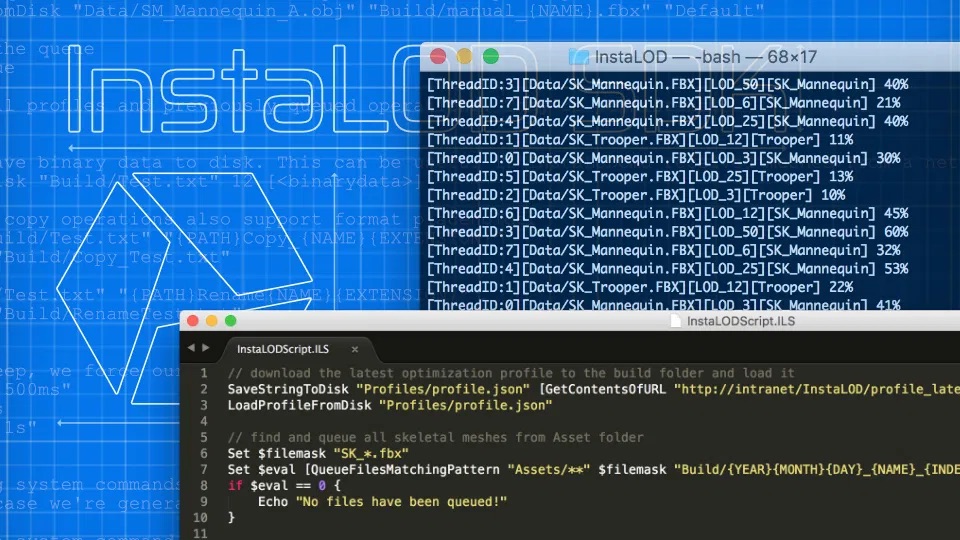
InstaLOD Pipeline (formerly named InstaLODCmd) is a cross-platform console application that enables you to perform mesh operations on a batch of 3D models or scenes without having to use a graphical user interface. Complex batch processes can be set up within minutes by specifying optimization profiles and batches using JSON.
InstaLOD Pipeline also forms the optimization backend for InstaLOD for Autodesk Maya and InstaLOD for Autodesk 3ds Max.
¶ Getting Started
To get started quickly with InstaLOD Pipeline, it is recommended to inspect the sample files that are included in the InstaLOD Pipeline distribution.
InstaLOD Pipeline works by executing mesh operations as specified by JSON profiles on input files queued either via JSON batch files or by manually queuing them by specifying file or folder input via program arguments. Multiple profiles and batches can be loaded and executed in parallel with a single invocation of InstaLOD Pipeline.
InstaLOD Studio provides a graphical user interface for InstaLOD Pipeline making it easy to run an InstaLOD profile as a batch process on multiple files and folders. To learn more about using InstaLOD Pipeline within InstaLOD Studio, please read our dedicated article here.
¶ Prerequisites
InstaLOD Pipeline for Windows has been built using Visual Studio 2022 and requires the installation of the Visual C++ Redistributables for Visual Studio 2022. If you have already installed Visual Studio 2022 or later on your workstation, the installation of the Visual Studio 2022 redistributables is not necessary.
InstaLOD Pipeline for Windows is compatible with Windows 10 and later as well as Windows Server 2016 and later. InstaLOD Pipeline for macOS requires macOS Sierra 10.12 or later.
¶ License
¶ Machine Authorization
Before InstaLOD Pipeline can be used, your workstation needs to be authorized. To authorize your workstation cd into the InstaLOD Pipeline directory, execute the following command and replace the placeholders with your actual license information:
InstaLODCmd -authorize <email/username> <license/password>
Your workstation is now authorized for use with InstaLOD. Make sure to deauthorize your workstation before uninstalling InstaLOD or you will not be able to authorize another workstation.
Machine authorization for InstaLOD is system-wide. If you've already been using InstaLOD on your computer, there is no need to authorize your machine for InstaLOD Pipeline.
Make sure to deauthorize your workstation prior to uninstalling InstaLOD, or the seat/node will remain locked.
¶ Machine Deauthorization
To deauthorize your workstation prior to uninstalling InstaLOD Pipeline, use the -deauthorize argument:
InstaLODCmd -deauthorize <email/username> <license/password>
Deauthorization takes 24 hours to complete. Until the deauthorization cycle is fully complete the seat/node will remain locked and cannot be used to activate another machine.
¶ Offline Authorization (Enterprise)
Enterprise licensees can make use of offline authorization in situations where a machine that needs to be activated has no access to the internet. In these cases, a machine that has an active internet connection can be used to create a license file on behalf of another machine.
First, it is necessary to acquire the machine key of the target machine by specifying the -machineKey argument:
InstaLODCmd -machineKey
InstaLOD Pipeline will now output the machine key to the console. Copy and paste the key to the machine that will fulfill the authorization request and specify the machine key together with the authorizeKey argument:
InstaLODCmd -authorizeKey <key> <filename> <email/username> <license/password>
InstaLOD Pipeline will now request a license file for the specified <key> and write it to the specified <filename>.
Copy the generated license file to the target machine and ingest it into the InstaLOD licensing system by specifying the -ingestLicense argument:
InstaLODCmd -ingestLicense <filename>
The target machine will now be fully activated and ready for use with any of the tools that are part of the InstaLOD SDK.
¶ Profiles and Batches
InstaLOD ships with profile templates for each operation supported by the InstaLOD SDK. It is recommended to use these bundled profiles as a starting point when creating new profiles. Each field or setting in a profile template is fully documented, so they serve both as a template and as documentation at the same time.
In order to queue files for optimization, a valid profile needs to be loaded. Profiles can be loaded by specifying the -profile argument followed by a filename:
-profile <filename>
Once a profile has been loaded, files can be queued by either loading a batch file, specifying a file or searching through a folder. To load a batch file specify the -batch argument.
-batch <filename>
Files are queued directly using the -file argument. The -file argument accepts the following arguments in fixed order:
-file <input filename> <output filename> <profile name>
By passing the -folder argument to InstaLOD Pipeline entire folders can be queued at once by specifying a search folder and a file-mask. The -folder argument requires the following arguments in a fixed order.
-folder <search path> <file mask> <output format> <profile name>
If the search path argument ends with /**, InstaLOD Pipeline will recursively search for all files in all sub-folders of the specified folder.
When queuing files using -folder, a format string needs to be used to avoid overwriting a single output file name. Format strings can be used anywhere an output path is specified.
For more information on built-in variables and format strings, please refer to the chapter Format strings with InstaLOD Script variables.
The following command searches recursively through the Data/ folder and queues all files that match the file mask SK_*.fbx using the OptimizeDemo profile.
InstaLODCmd -profile "Profiles/Optimize.json" -folder "Data/**" "SK_*.fbx" "Build/{YEAR}{MONTH}{DAY}_{MESH.FILENAME}_{INDEX}.fbx" OptimizeDemo
Multiple profiles, batches, files and folders can be specified in a single InstaLOD Pipeline invocation.
However, profiles need to be loaded prior to queuing any batches, files or folders that are referencing a particular profile.
InstaLOD Pipeline makes use of all available CPU cores. Therefore, it is recommended to batch as many operations as possible in a single invocation.
Profiles can be created and edited manually using any text editor. InstaLOD Pipeline profiles are also the native file format of InstaLOD Studio XL which provides a friendly user interface to create sophisticated LOD chains or multi-step operations in a single profile. Another excellent way to create InstaLOD Pipeline profiles is by using InstaLOD for Autodesk Maya or InstaLOD for Autodesk 3ds Max. Both integrations can export operation-based profiles and profiles that build LOD chains using the Batch functionality of the integrations.
Working with InstaLOD Studio XL to configure and export profiles is our preferred way of creating new profiles.
InstaLOD Pipeline ships with well-documented template profiles for all operation types supported by InstaLOD.
It is highly recommended to use these bundled profiles as a starting point when creating new profiles for InstaLOD Pipeline.
¶ Polygon Optimization
Polygon Optimization is the process of removing polygons until the polygon count of the mesh matches the target value. InstaLOD is able to optimize meshes with multiple millions of polygons while maintaining vertex attributes like normals, texture coordinates, and colors. Artists can influence the optimization by using vertex colors to mark vertices for preservation or for early removal. When optimizing skinned meshes, InstaLOD will automatically try to preserve polygons around areas critical for the animation. Additionally, InstaLOD features built-in skeleton rig optimization to reduce the number of bones or vertex weights required to animate the model.
InstaLOD's Smart Optimizer mode aims to produce the best result on a variety of mesh topologies without requiring any additional configuration.
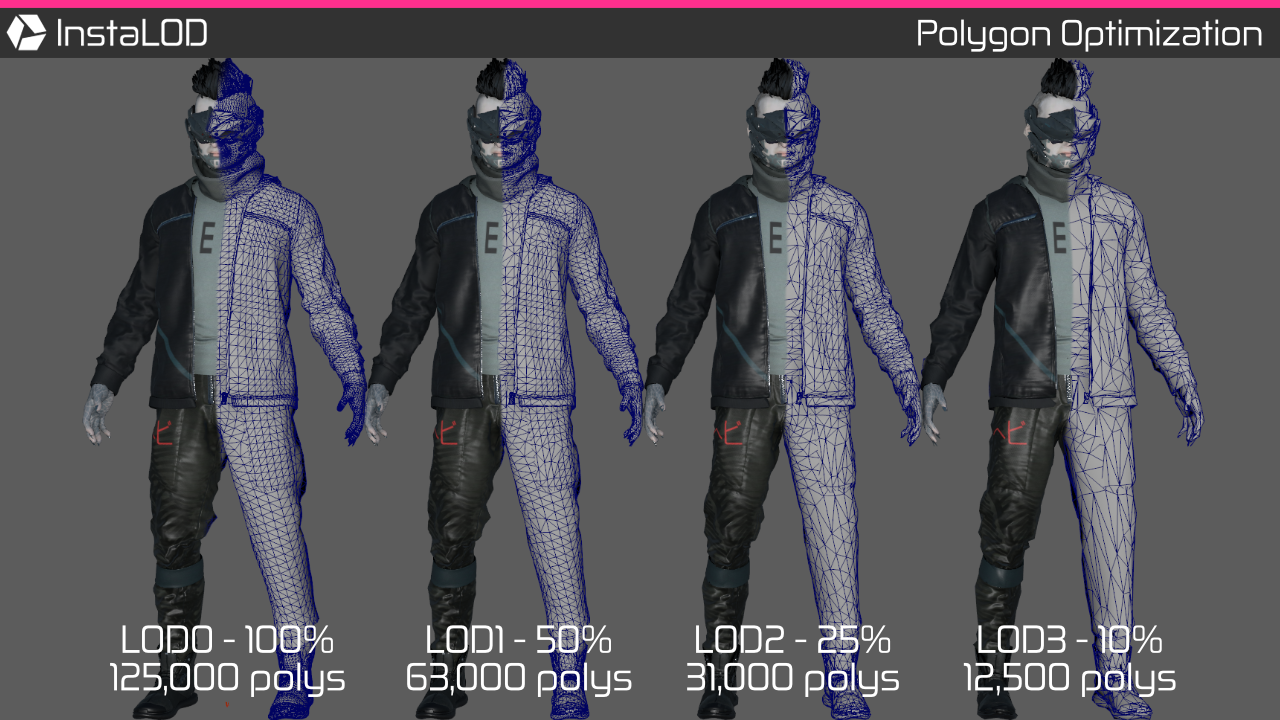
The polygon optimization profile template can be found at Profiles/Optimize.json. The bundled optimization profile creates a LOD chain with 4 entries at 100%, 50%, 25% and 10% triangles of the input mesh.
Execute the following command in a shell to load the template profile and execute a sample batch. The batch file consists of two meshes, a static couch model and an animated and skinned parasite zombie:
InstaLODCmd -profile Profiles/Optimize.json -batch Batch/Optimize.json
Remember, it is not necessary to use batch files to optimize your data. To optimize the contents of a single model file, specify it using the -file argument:
InstaLODCmd -profile Profiles/Optimize.json -file Data/SM_Zetsuda_130k.fbx Build/SM_Zetsuda_Optimize.fbx OptimizeDemo
The
SM_Zetsuda_130kmodel is a AAA quality game character that is comprised of more than 35 high-resolution textures (up to 4k). It is making use of the Stingray PBS-material found in 2016 and later versions of Autodesk Maya, Autodesk Maya LT, and Autodesk 3ds Max.The character is also being used to demonstrate the powerful material merging capabilities of the InstaLOD SDK.
See the chapter Merging Mesh Materials for more information.
Make sure to review the bundled profile template located at Profiles/Optimize.json to get a better understanding of all settings related to the polygon optimization operation.
By combining multiple operations InstaLOD is able to perform complex optimization operations like Visibility-Based Mesh Optimization or custom polygon remeshing as described in the chapter Mesh Operation Chains.
In our tutorial video series, we explain features such as global optimization, demonstrate how to utilize vertex painting to preserve certain areas, show how to achieve the best results when optimizing rigged models and much more.
https://www.youtube.com/watch?v=PRWLvIoyTh0&list=PLeDPNRvpG2BE8P3uu0sx6cIllhIAfDQXE
¶ Optimizing without a Profile
Optimization can be performed without creating an optimization profile. To optimize without a profile specify the -instaOptimize argument followed by the target amount of polygons in percent between 1 and 100. InstaLOD will automatically create a default profile with the specified optimization target in percent. It is worth mentioning that if the instaOptimize argument has been specified, all queued files and batches will use the automatically created optimization profile.
InstaLODCmd -instaOptimize 50 -file Data/SM_Couch_10k.fbx Build/Opt_{MESH.FILENAME}{MESH.EXTENSION} InstaOptimize
¶ Remeshing
Remeshing is the process of using input mesh data to construct a new mesh from scratch. A normal map is generated in the process that is used to authentically replicate the shading of the input mesh, even when going from multiple millions of polygons down to a few thousand.
Full control over the remeshing resolution and the target face count enables users to create the ideal output mesh for every specific situation.
With features like Automatic Occlusion Geometry or Ignore Backfaces even non-manifold input meshes can be remeshed without generating interior faces.
InstaLOD's remeshing is both powerful and fast. Therefore, it is highly recommended to watch the tutorial videos that cover the remeshing specific features and settings in detail.
https://www.youtube.com/watch?v=6f1FwLc4liE&list=PLeDPNRvpG2BGOH8ZhHoHIq9pnFBm3vpk-&index=1&t=2s
The remeshing profile template can be found at Profiles/Remesh.json. The bundled remeshing profile remeshes the input file at Normal resolution using a fuzzy face count target of Normal. Using the fuzzy face count target is a great way to create real-time ready assets without specifying a target polygon count that needs to be updated for each mesh. When using a fuzzy face count target, InstaLOD chooses an appropriate target face count based on the remeshing resolution, the input mesh face count, the input mesh complexity and it's bounding box size.
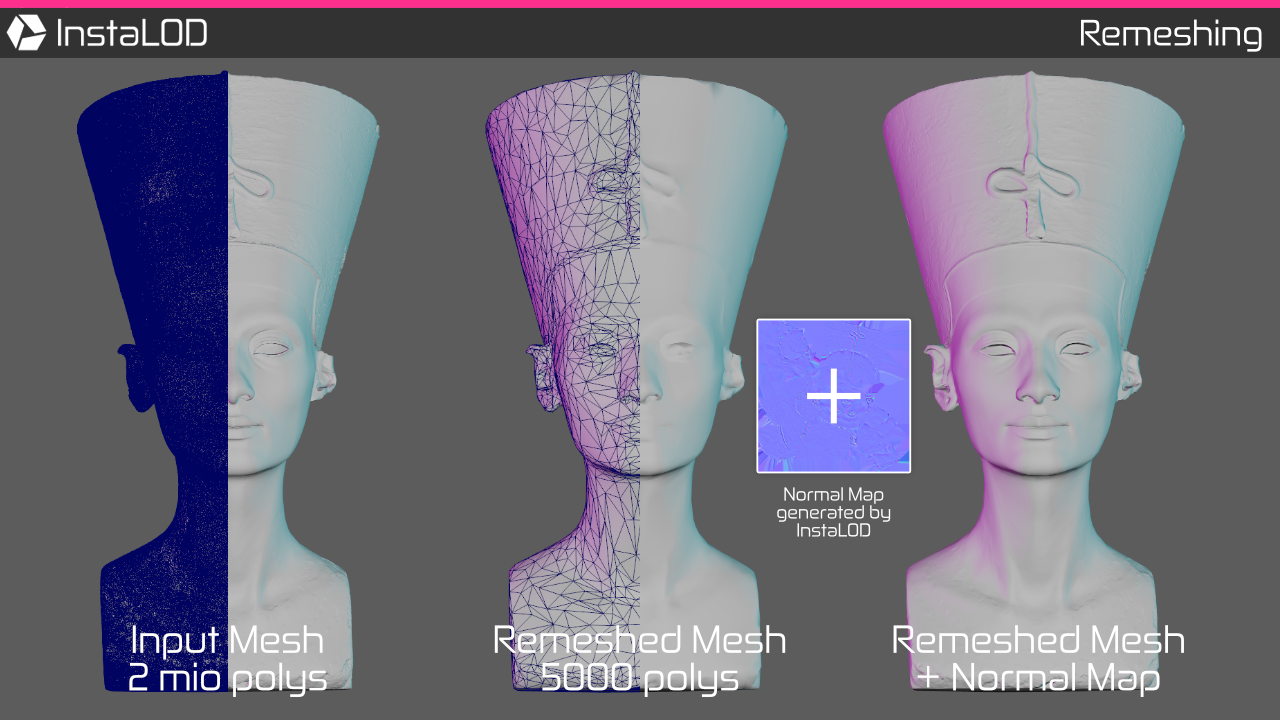
The following command uses the remeshing profile template to remesh the 2 million polygon mesh. The resulting surface will have approximately 5000 polygons and a normal map texture to reproduce the fine details of the high poly input mesh.
InstaLODCmd -profile Profiles/Remesh.json -file Data/SM_Scan_Nefertiti_2mio.fbx Build/SM_Nefertiti_Remesh.fbx RemeshDemo
Maya Specific: if color management is enabled, make sure to set the color space of the normal map texture to
Rawor severe rendering artifacts will be present when rendering assRGB.Normal Map Tangent Space: the template profile outputs a tangent space for
OpenGLby default.
The tangent space can be set toDirectXby changing theTangentSpaceFormatfield in the profile.Game Engine Specific: If your game engine computes the binormal/bitangent per fragment set the
ComputeBinormalPerFragmentfield to true in the profile.
(Unreal Engine 4:true, Unity:false)Please see the chapter Rendering Normal Maps for more information.
¶ "Game-Ready" Remeshing
This workflow is intended to be used for the rapid creation of "Game-Ready" prop assets, where a small trade-off in quality can be made for a game-changing boost in efficiency and thus saving huge amounts of development time.
- Take existing high poly sources from generic 3D object repositories and get them game-ready in minutes.
- Create environment props by quickly throwing together high poly props and let InstaLOD turn the scene into a game-ready prop.
- Turn high-poly subdivision surfaces or sculpted objects into game ready props without retopologizing the asset.
The possibilities are endless and with some basic understanding of the system, you will be creating incredible assets with minimum effort in no time.
Check out our tutorial videos for some great examples on how this workflow can revolutionize your production.
https://www.youtube.com/watch?v=z7Q7XwZR-UE
InstaLOD Pipeline ships with a profile template that produces "Game-Ready" assets. The profile can be found at Profiles/RemeshGameReady.json.
This profile remeshes the input mesh using a High Resolution and a Normal fuzzy face count target.
Important for this particular workflow are the output texture maps. The "Game-Ready" profile will automatically generate all texture maps necessary to texture the asset generated by InstaLOD in tools like "Substance Painter" or "Substance Designer":
- Tangent Space Normals
- Object Space Normals
- Position
- Thickness
- Curvature
- Ambient Occlusion
- Mesh ID
Textures will be generated with a 2048x2048 resolution using x2 super sampling. Existing texture maps of the input mesh will be automatically transferred to the mesh constructed by InstaLOD.
InstaLODCmd -profile Profiles/RemeshGameReady.json -file Data/SM_Game_MilitaryCrate_1mio.fbx Build/SM_Game_MilitaryCrate_GameReady.fbx RemeshGameReadyDemo
When importing the geometry created with this profile in Substance Painter or Substance Designer, set the Tangent Space to
OpenGLand disableCompute Tangent per Fragment.Additionally set the texture resolution to 2048x2048.
It is highly recommended to use 'Tri-planar projection' when texturing with Substance tools to minimize visible seams where possible.
For more information on using InstaLOD with Substance tools check out our tutorial videos.
¶ Imposters
Imposters are stand-in meshes typically used for foliage type meshes that are difficult to optimize otherwise.
InstaLOD is capable of creating a wide range of different imposter types:
- AABB
- Flip-book
- Billboard
- (Hybrid) Billboard Cloud
- Imposters using custom geometry
Imposter creation with InstaLOD is a one-click solution with full support for per-pixel light and the creation of advanced maps like curvature, AO and more.
The imposterize profile template can be found at Profiles/Imposterize.json. The bundled imposterize profile creates a regular billboard imposter with two-sided quads spawned along the XY-axis and YZ-axis.
InstaLODCmd -profile Profiles/Imposterize.json -file Data/SM_Tree_Birch.fbx Build/{MESH.FILENAME}_Imposter.fbx ImposterizeDemo
¶ Hybrid Billboard Cloud Imposters
Hybrid billboard cloud imposters are a new method of creating highly optimized representations of foliage meshes.
One of the great benefits of using hybrid billboard cloud imposters is the preservation of volume and depth, which allows for excellent self-shadowing. By mixing billboard abstractions for leaves and regular polygon meshes for trunks and branches this kind of hybrid imposter can hold up even on close inspection. However, using poly meshes for certain parts of the mesh is not a strict requirement. If no meshes are found in the scene where the name matches the CloudPolygonalGeometryMeshSuffix as configured in the profile, the entire mesh will be built using billboards.
The imposterize profile template can be found at Profiles/ImposterizeCloud.json. The following example uses a batch file to create a hybrid billboard cloud imposter each of the two input meshes in the batch:
InstaLODCmd -profile Profiles/ImposterizeCloud.json -batch Batch/Imposterize.json
https://www.youtube.com/watch?v=JZctnk-VS1s
The video above shows Unreal Engine 4 rendering a hybrid billboard cloud imposter next to the respective input mesh that was used to create the imposter.
Even though imposters are designed to be viewed at a distance, when used properly they can create a result that holds up well when viewed up close.
¶ Rendering Hybrid Billboard Cloud Imposters
The result is best rendered using a two-sided masked material for the entire mesh. It is highly recommended to utilize a material that supports two-sided foliage rendering so leaves are properly lit. Alternatively, a MeshID map can be generated by InstaLOD to determine when to discard fragments during runtime. If the material is properly lit hybrid billboard cloud imposters can produce stunning results at a very low rendering cost.
¶ Merging Mesh Materials
Both characters and environment props are often constructed using modular pieces or a process called "kit-bashing".
These techniques are a great way to create a wide variety of assets while keeping production time down.
One major drawback of these techniques is that it often requires multiple material textures for such a composed mesh - resulting in a high per object draw-call count. Therefore, the improvements in production time take a toll on rendering performance.
With InstaLOD such cases can be beautifully optimized by merging all material textures onto a single output texture. Material size on the resulting texture can be configured by adjusting importance weights:
- Visual weight, fast ray-tracing against the scene at a low resolution to determine visible material to pixel coverage.
- Texture weight, weights generated via texture dimensions.
- World-space geometry weight, weights generated by determining material coverage in world-space units.
- UV weight, weights generated by determining material coverage in UV space.
High-quality solidification, super-sampling and full control over UV-shell rotation constraints ensure best-mode quality in all cases. InstaLOD supports merging materials of both static and skinned models or a combination of both. Handling large scenes with multiple millions of polygons and over-sized 30k textures is no problem for InstaLOD.
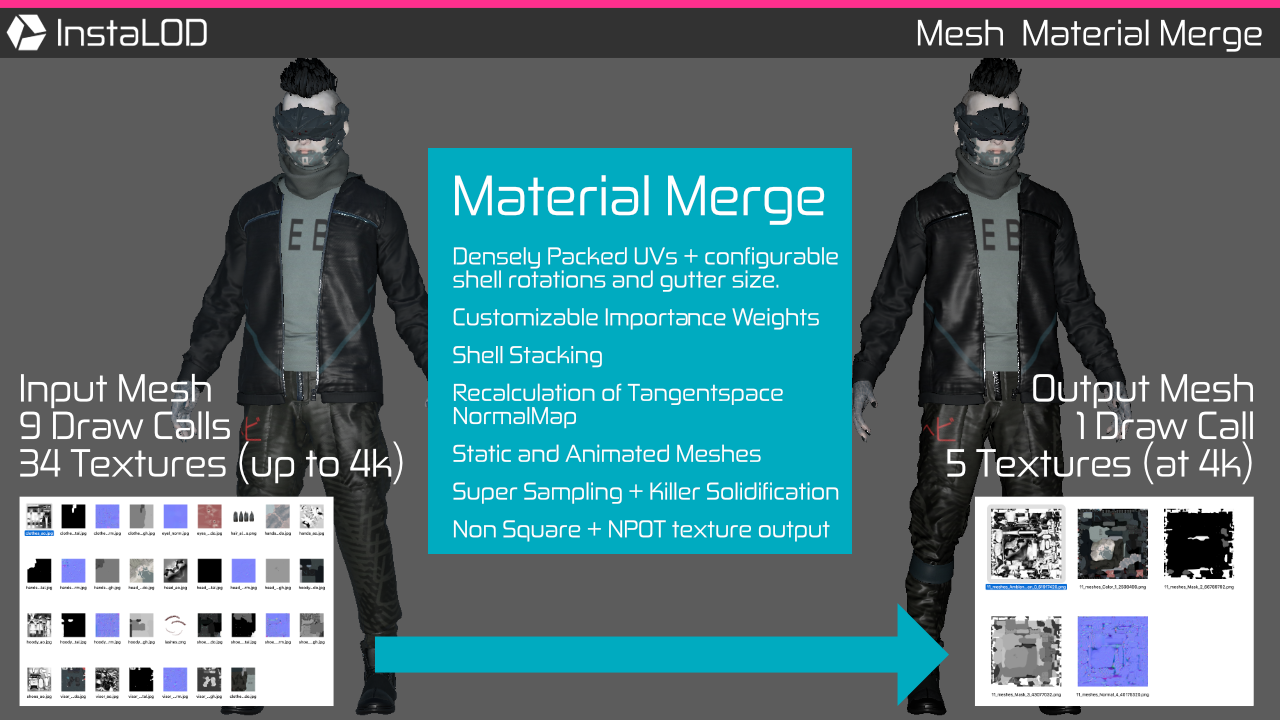
The mesh material merge profile template can be found at Profiles/MaterialMerge.json.
The bundled mesh material merge profile creates a 2048x2048 output texture using x2 super-sampling.
InstaLODCmd -profile Profiles/MaterialMerge.json -file Data/SM_Zetsuda_130k.fbx Build/SM_Zetsuda_MaterialMerge.fbx MeshMaterialMergeDemo
¶ Occlusion Culling
InstaLOD features high precision occlusion culling that uses an in-house developed multi-threaded ray tracer. Visible faces are determined by ray-tracing the scene to a preconfigured resolution using one or multiple cameras stored in the input file.
Occluded geometry can be either directly removed by InstaLOD or vertex colors can be written that can be used to further process the mesh. In order to avoid removing single faces of large geometry, InstaLOD supports removing geometry on a per sub-mesh basis. When culling on a per sub-mesh basis, the entire sub-mesh will be removed, if less than a specified number of faces are visible. Additionally, InstaLOD supports automatically removing interior faces as a zero-configuration solution.
¶ Automatic Interior Culling
As a zero-configuration solution to removing interior geometry the automatic interior culling mode can be used. Depending on the complexity and density of the input mesh the fields Resolution, AutomaticPrecision and AdjacencyDepth can be increased at the cost of processing time.
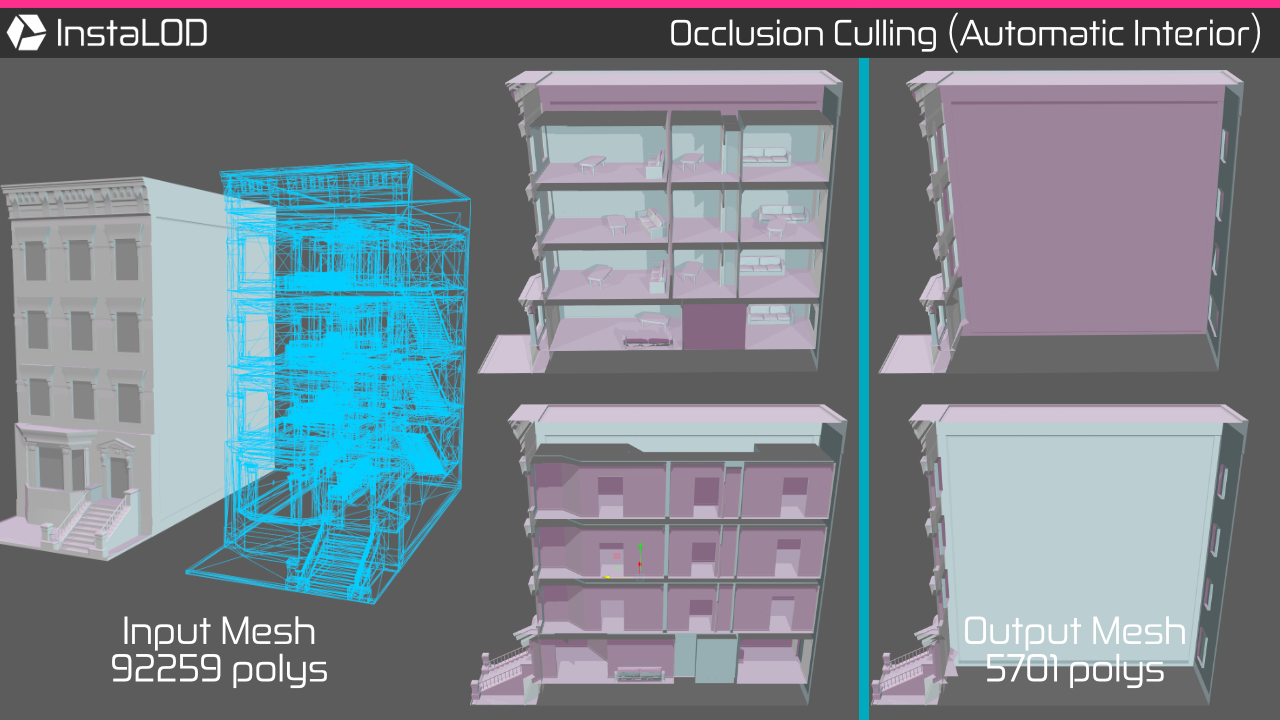
The occlusion culling profile template can be found at Profiles/OcclusionCullAutomatic.json.
InstaLODCmd -profile Profiles/OcclusionCullAutomatic.json -file Data/SM_OC_House.fbx Build/SM_House_CullAutomatic.fbx OcclusionCullAutomaticDemo
¶ Camera-Based Occlusion Culling
Camera-based occlusion computes occlusion data based on one or multiple cameras. Both perspective and orthogonal cameras found in the input file will be used for occlusion culling.
In order to better comprehend the view of the camera used for the operation, InstaLOD supports writing ray traced image output to disk. To enabled image rendering simply set RenderOutputPath to a valid path.
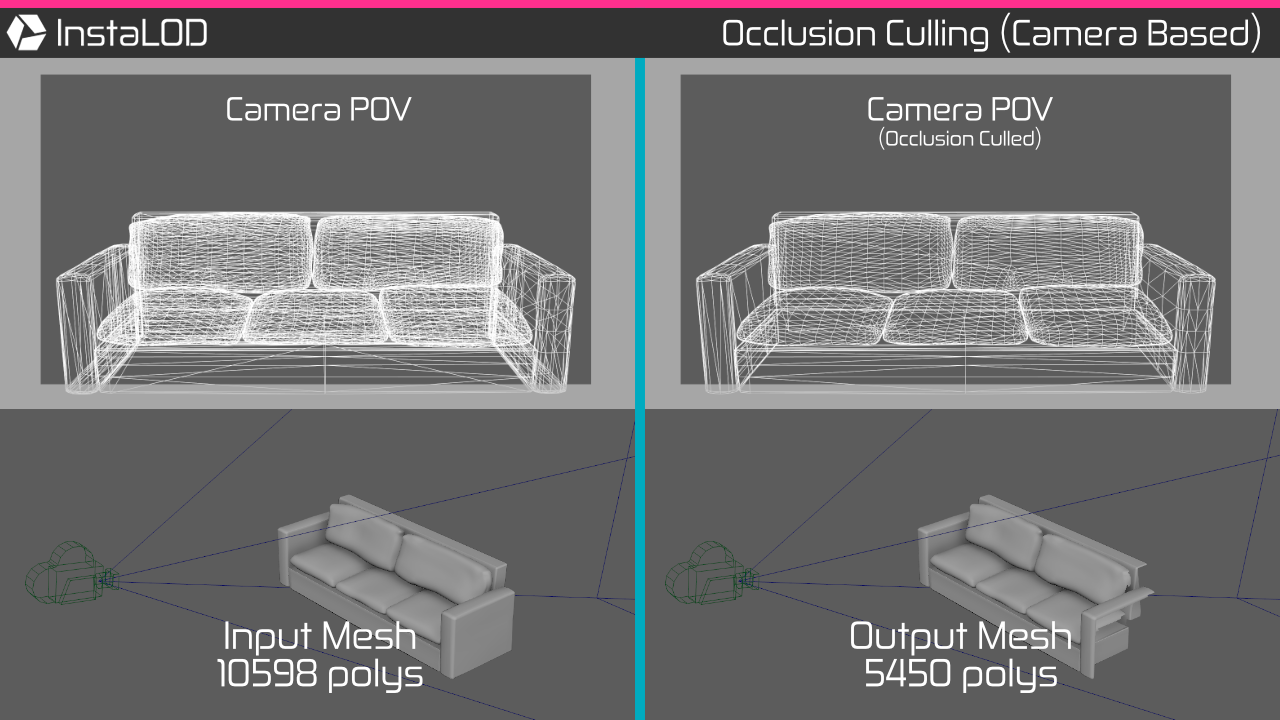
The occlusion culling profile template can be found at Profiles/OcclusionCullCamera.json. The bundled occlusion culling profile uses a custom camera to remove occluded faces and writes camera output to the Build/ folder.
InstaLODCmd -profile Profiles/OcclusionCullCamera.json -file Data/SM_OC_House.fbx Build/SM_House_CullCamera.fbx OcclusionCullCameraDemo
¶ Visibility-Based Mesh Optimization
Combining occlusion culling and mesh optimization allows for visibility based mesh optimization. This is a great way to ensure that the optimizer chooses to remove occluded faces before removing visible faces.
By setting the field DataUsage to WriteOptimizerWeightsToWedgeColors InstaLOD is able to use the visibility data to write optimizer weights into the vertex color channel of the output mesh.
In order to use the output of one operation as input for another operation in the same profile, set the UsePreviousOutputAsInput field to true. This functionality enables the mesh optimization operation to use the optimizer weights generated by the occlusion cull operation to further optimize the mesh.
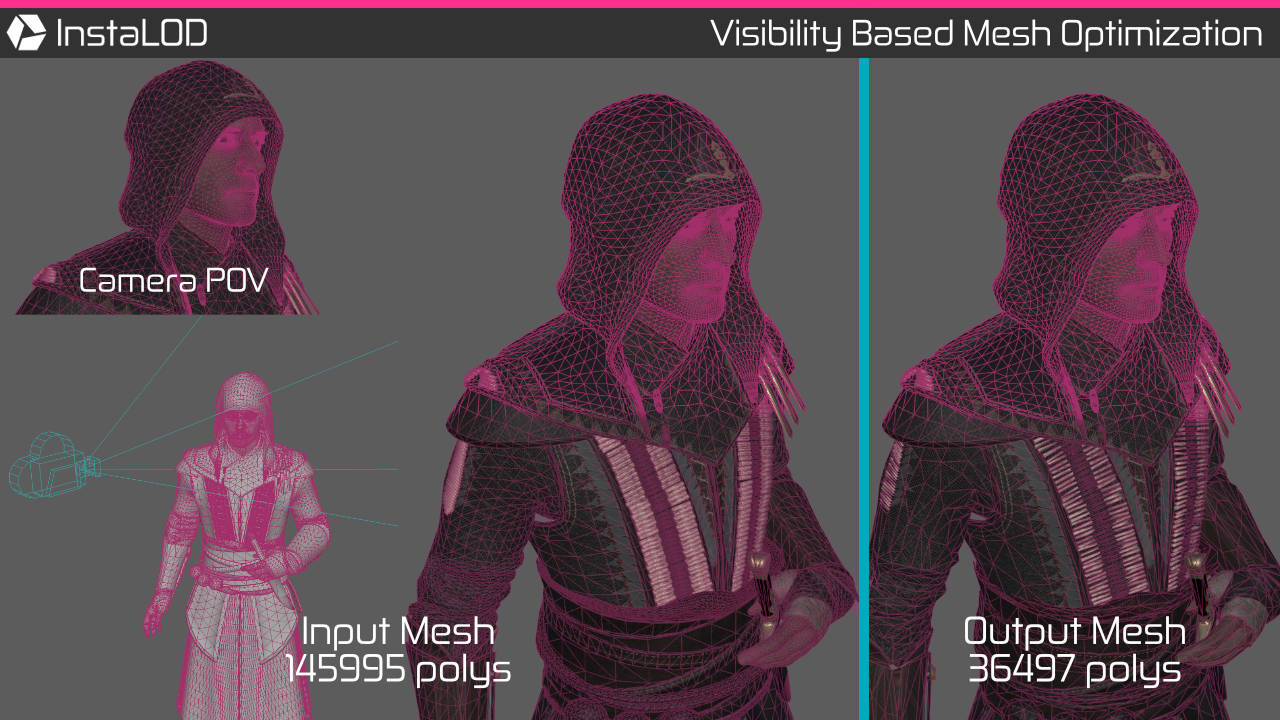
In the image above, a character model has been reduced to 25% of the initial face count using visibility based mesh optimization. A camera has been placed that captures only the shoulders and the head of the model (bright edges). The optimized mesh topology that is visible by the camera that was used to perform the occlusion culling remains unchanged. However, occluded polygons - or polygons outside the camera's frustum (dark edges) have been heavily optimized by InstaLOD.
The visibility based mesh optimization profile template can be found at Profiles/VisbilityOptimize.json. The bundled profile uses a custom camera to generate optimizer weights for the input mesh and optimizes the mesh to 25% while making use of the generated optimizer weights.
InstaLODCmd -profile Profiles/VisbilityOptimize.json -file Data/SM_OC_House.fbx Build/SM_House_VisOptimize.fbx OcclusionCullDemo
For more information on how to create complex chained operations please see the chapter 'Mesh Operation Chains'.
¶ UV operations
InstaLOD's powerful UV functionality can also be used outside of any optimization functionality. This can be useful to automatically UV parameterize surfaces (UV Unwrap) or to improve the UV packing of existing meshes.
¶ UV Unwrap
The UV Unwrap template can be found at Profiles/UVUnwrap.json. InstaLOD's UV unwrapper features three distinct algorithms with each having its strengths on different kinds of input meshes. Organic works great for organic meshes while HardSurfaceAxial and HardSurfaceAngle are better suited for hard-surface/constructed type meshes.
The bundled UV Unwrap profile is configured to use the HardSurfaceAxial algorithm, as the couch model used in this example is a hard-surface type mesh.
InstaLODCmd -profile Profiles/UVUnwrap.json -file Data/SM_Couch_10k.fbx Build/SM_Couch_Unwrap.fbx UVUnwrapDemo
¶ UV Repack
The UV Pack template can be found at Profiles/UVPack.json.
The UV packer will create a new UV layout for the input meshes. It is able to stack duplicate shells and create layouts for non-square textures.
In order to preserve axis-aligned shells, constraints can be configured that determine how the packer can rotate shells: Allow90 (90° rotations only), None (no rotations) or Arbitrary (arbitrary rotations).
The bundled UV Pack profile repacks the input mesh UV channel 0 to a 1024x1024 texture with a 2px gutter size and writes the result into UV channel 1.
InstaLODCmd -profile Profiles/UVPack.json -file Data/SK_ParasiteZombie_10k.fbx Build/SK_ParasiteZombie_Repack.fbx UVPackDemo
¶ Baking
InstaLOD features a sophisticated baker that is fully batch-able and scalable in terms of both output texture dimensions and polygon counts. Source meshes can be targeted by name using regular expressions to avoid baking onto the wrong target mesh. Even the trickiest bakes can easily be solved without inserting additional edges, by utilizing baking cages that have a different topology than the target mesh. A wide range of internally generated texture maps and the capability to transfer existing normal and texture maps make InstaLOD's baker the go-to solution for even the most challenging bake.
High-quality dilation and post-process solidification ensure that you will always get best-mode quality for textures generated by InstaLOD.
¶ Targeting Meshes By Name
InstaLOD's baker renders high quality bakes while keeping iteration speed high and setup friction low. By default, InstaLOD will bake all source meshes onto all target meshes. However, in some cases, it is preferable to perform targeted bakes.
Enable MatchMeshByName to match source meshes to target meshes by name. This avoids baking wrong source geometry to target meshes. Meshes matching the suffix configured in the field MatchMeshByNameTargetSuffix will be considered as target mesh. The suffix will be truncated and the resulting string will form the mesh name that is used to identify matching meshes. Meshes matching the regular expression (ECMA, ignore-case) configured in the field MatchMeshByNameSourceRegExFormat will be used as source mesh.
All source meshes that do not match the source mesh regular expression will be baked onto every target mesh in the scene.
Example 1:
hood_rail_low-> matches suffix_lowas configured in the fieldMatchMeshByNameTargetSuffix->
resulting mesh namehood_rail->
meshhood_rail_highmatches the format string regex{MESH.NAME}_highas configured in the fieldMatchMeshByNameSourceRegExFormat.Example 2:
pilot_target-> matches suffix_targetas configured in the fieldMatchMeshByNameTargetSuffix->
resulting mesh namepilot->
meshpilot_source_Amatches the format string regex{MESH.NAME}_source(.*)as configured in the fieldMatchMeshByNameSourceRegExFormat->
meshpilot_source_Balso matches the regex as configured in the fieldMatchMeshByNameSourceRegExFormatas the source mesh name regular expression is configured in a way that allows additional characters after the_sourcestring.
¶ Internally Generated Texture Pages
In addition to transferring existing normal and texture maps, InstaLOD supports the creation of texture maps that are directly or indirectly derived from the source mesh.
The following texture pages can be automatically generated by InstaLOD.
| Name | Field | Pixel Format |
|---|---|---|
| NormalTangentSpace | TexturePageNormalTangentSpace | 16bpp RGB |
| NormalObjectSpace | TexturePageNormalObjectSpace | 16bpp RGB |
| MeshID | TexturePageMeshID | 8bpp RGB |
| VertexColor | TexturePageVertexColor | 16bpp RGBA |
| AmbientOcclusion | TexturePageAmbientOcclusion | 8bpp LUMINANCE |
| BentNormals | TexturePageBentNormals | 16bpp RGB |
| Thickness | TexturePageThickness | 16bpp LUMINANCE |
| Displacement | TexturePageDisplacement | 16bpp LUMINANCE |
| Position | TexturePagePosition | 16bpp RGB |
| Curvature | TexturePageCurvature | 16bpp LUMINANCE |
| Transfer | TexturePageTransfer | 16bpp RGB |
| Opacity | TexturePageOpacity | 8bpp RGBA |
| Barycentryc | TexturePageBarycentric | 16bpp RGBA |
Generating AmbientOcclusion, Thickness and BentNormals texture pages can cause a stark increase in processing time when creating high resolution textures due to the computationally intensive algorithms involved in rendering these texture pages.
¶ Baking Vertex Colors
By default, existing vertex colors of the source mesh will be transferred. However, both internally and externally sampled texture pages can be baked into vertex colors instead.
When AutoMatchTexturePages is enabled, external texture page names are generated by their type followed by their index ex. Color_0, Color_1. Internal texture pages like Ambient Occlusion are referenced by their name ex. AmbientOcclusion.
¶ Your First Bake with InstaLOD Pipeline
The bake template can be found at Profiles/Bake.json. InstaLOD's baker is highly configurable and supports many features that ensure you get the best possible result. Using the bundled bake template profile, we can easily perform a bake in the same way other mesh operations are executed:
InstaLODCmd -profile Profiles/Bake.json -file `Source Mesh File` `Target Mesh File` BakeDemo
When baking, the input filename will be used as source mesh file and the output filename as target mesh file. Baking supports queuing folders using the -folder command and batch files using the -batch command in the exact same manner as every other mesh operation. Output textures will be written to the OutputPathFormat as configured in the Materials section of the bake profile.
Besides textures, InstaLOD Pipeline will also generate a output filename_bake.fbx file that contains the target meshes with materials that reference all generated materials.
If you are in a situation where a single file contains both the source and the target mesh or meshes. You can specify the same file for both input and output. However, this requires the bake profile to target meshes by name.
InstaLODCmd -profile Profiles/Bake.json -file Data/SM_Game_MilitaryCrate_1mio.fbx Data/SM_Game_MilitaryCrate_Target.fbx BakeDemo
¶ Baking Cages
InstaLOD's baker supports using baking cages with an entirely different topology than the target mesh.
This allows you to insert edge loops to bake beautiful bevels, cut out pieces to perfectly bake decals or build your geometry around specific objects.
When using a cage mesh, InstaLOD matches cage and target meshes via the UV-space, therefore it is important that the cage mesh UVs match those of the target mesh.
Ensuring that UVs stay in place when creating the baking cage for your target mesh can be a trivial task. When using Maya simply enable the move-tool setting 'Preserve UV' prior to moving components - or use the 'Multi-Cut' when inserting additional helper edges or edge-guards.
Meshes matching the suffix configured in the field CageMeshSuffix will be used as a cage mesh. There is no limitation on the amount of cage meshes used in a bake.
By default, the cage mesh will dictate the origin of the ray that is cast during the bake. This gives artists precise control over the bake and helps to resolve bakes that would otherwise be wrong. However, baking cages become especially helpful once CageMeshNormalsAsRayDirections is enabled. Using the cage mesh's normals as ray directions enables artists to bake beautiful bevels and orthogonal decals onto a fully averaged surface (or bent normals on a surface with face normals). Therefore, it is not necessary to insert edges and polygons in the target mesh, which would normally only serve the purpose of forcing a specific vertex normal orientation.
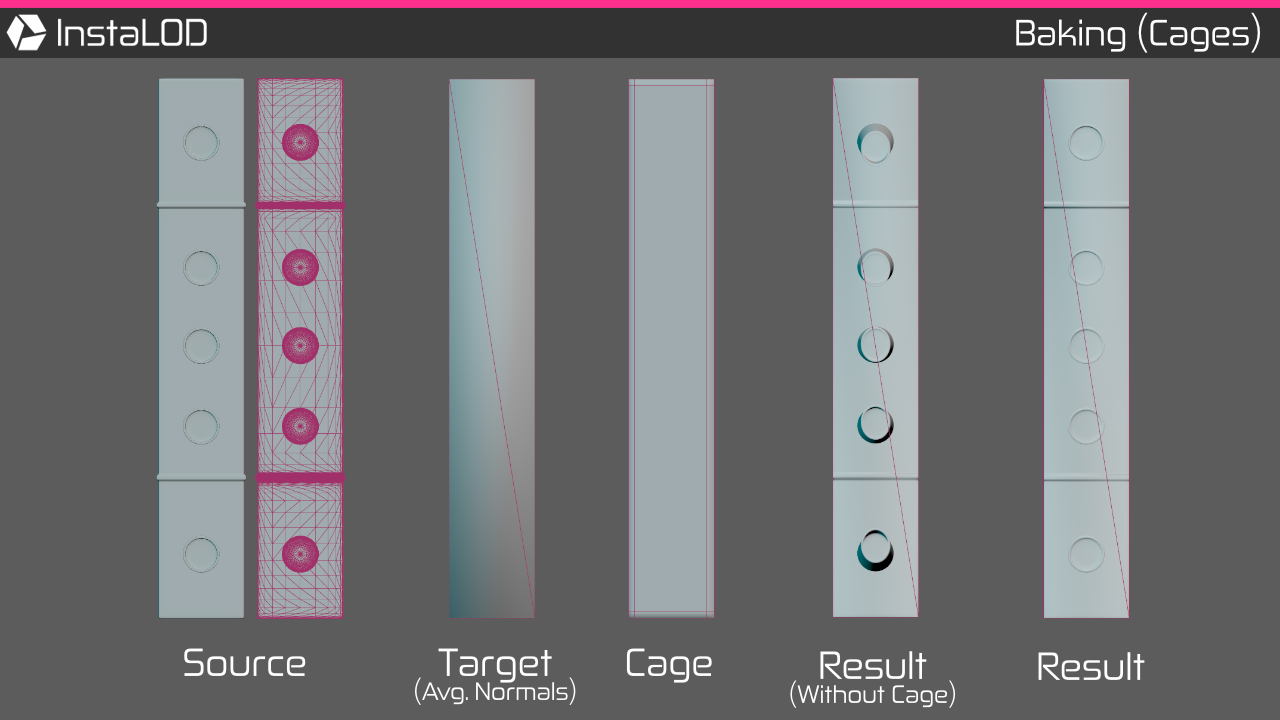
The following example helps to better illustrate the benefits of using cages. The target mesh cube_low is a simple cube, stretched along one axis. In order to avoid the "puffy surfaces" issue, the normals of the target have been averaged. The source mesh cube_high is the same cube but with smooth bevels and additional details added.
The following example bakes the mesh without using a cage:
InstaLODCmd -profile Profiles/Bake.json -file Data/SM_Bake_CageDemo_Source.fbx Data/SM_Bake_CageDemo_NoCage_Target.fbx BakeDemo
The bake will generate the output file Data/SM_Bake_CageDemo_NoCage_Target_bake.fbx with the normal map texture assigned. Upon reviewing the normal map that has been written to the Build/-folder, it becomes apparent that the additional details appear distorted. This is typical when using averaged normals, as baking rays are projected along the normals of the mesh.
One of the typical methods of solving this issue is to bake using a target mesh that has additional helper edges inserted. This ensures that the normals are orthogonal on flat surfaces but bent along the edges for smooth bevels. However, the resulting tangent space normal map cannot directly be used on the final mesh, as the topology is different.
Another intermediate step is required, as an object space normal map needs to be used and converted into a tangent space normal map usable on the final mesh. With InstaLOD this is not necessary, as baking cages can beautifully solve this issue to generate a tangent space normal map that is directly usable.
The following example bakes the mesh using a cage mesh cube_cage for the target mesh cube_low to solve the issue:
InstaLODCmd -profile Profiles/Bake.json -file Data/SM_Bake_CageDemo_Source.fbx Data/SM_Bake_CageDemo_Target.fbx BakeDemo
¶ Advanced Baking
InstaLOD's baker is highly configurable. Please refer to the baking template profile at Profiles/Bake.json to get an overview of all available settings and their meaning.
An excellent way to create InstaLOD Pipeline baking profiles is by using InstaLOD Studio XL. When matching meshes by name, InstaLOD Studio XL automatically maps source meshes to their targets in the Bake Outliner. This allows to configure and verify the name suffixes without executing the bake operation, even when using complex regular expressions.
InstaLOD for Autodesk Maya and InstaLOD for Autodesk 3ds Max can also export bake profiles.
Simply right-click theBake-button and selectExport as InstaLOD Pipeline Profile....
¶ Mesh Operation Chains
InstaLOD Pipeline supports creating complex operations by chaining together multiple mesh operations. This allows for the creation of unique and highly customized operations that can be used in the same way other profiles are used.
Mesh operation chains function by using the output of one operation as input for the next operation in a chain. In order to use the output of one operation as input for another operation in the same profile, set the UsePreviousOutputAsInput field to true. When using mesh operation chains, it can be desirable to disable the export of intermediate mesh operations, as only the final mesh operation's output is the intended result. To disable the export for specific mesh operations, simply set the Export field of the mesh operation entry to false.
InstaLOD ships with two template profiles that make use of mesh operation chains. The first example performs visibility based mesh optimization using two chained mesh operations. The profile can be found at Profiles/VisbilityOptimize.json.
InstaLODCmd -profile Profiles/VisbilityOptimize.json -file Data/SM_OC_House.fbx Build/SM_House_VisOptimize.fbx OcclusionCullDemo
The visibility based mesh optimization is described in detail in the dedicated Visibility Based Mesh Optimization chapter.
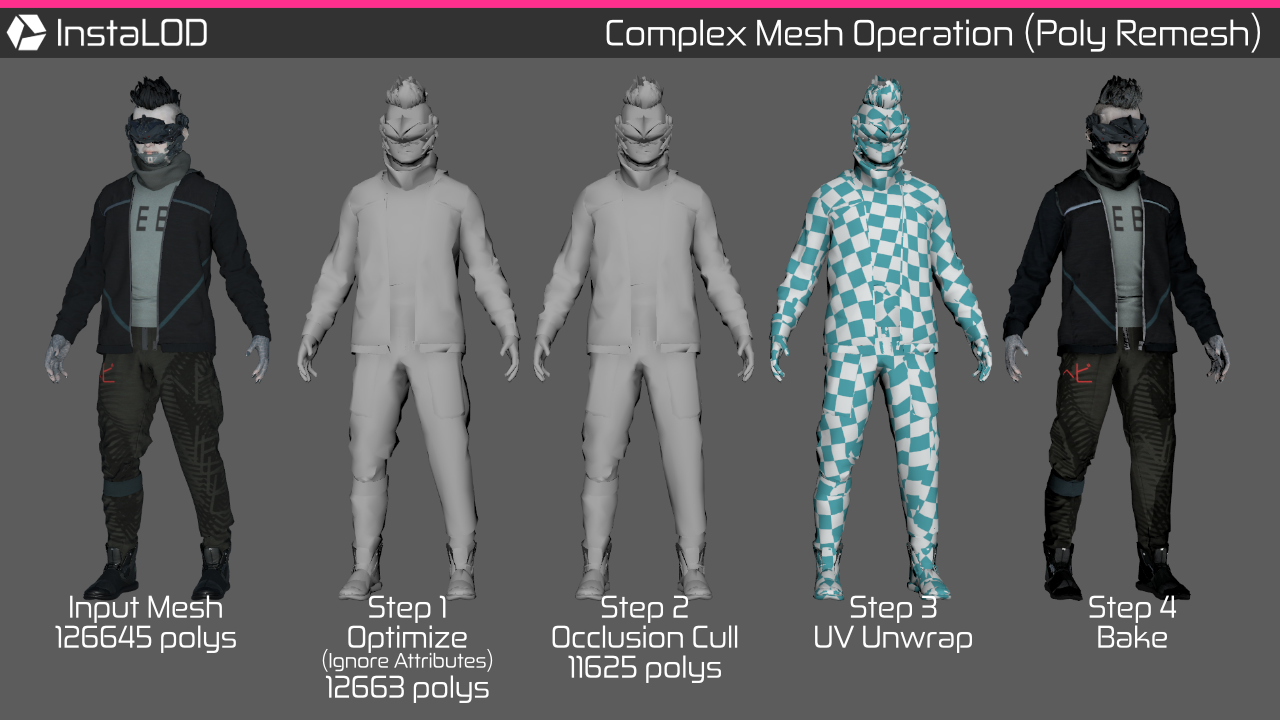
The second and more complex example can be found at Profiles/ComplexPolyRemesh.json. It performs a custom polygon-based remeshing using four different mesh operations:
- Optimize the input mesh to 10%, but discard all mesh attributes. This allows InstaLOD to optimize with the least amount of constraints and therefore it can generate best-mode for the raw geometry.
- Perform occlusion culling in automatic interior mode to remove all occluded faces.
- UV unwrap the surface and generate tangents.
- Bake the input mesh onto the unwrapped mesh.
To execute the profile, invoke the following command:
InstaLODCmd -profile Profiles/ComplexPolyRemesh.json -file Data/SM_Zetsuda_130k.fbx Build/SM_Zetsuda_PolyRemesh.fbx ComplexPolyRemeshDemo
¶ Materials
The material configuration in InstaLOD Pipeline is tied to a profile but common accross all operations that make use of materials or textures. This means that the same configuration can be used in all profiles.
InstaLOD uses Texture Pages to configure output texture specifications like texture dimensions and pixel format. At the same time texture pages are used to determine the input and output type for individual input textures and to which output texture its contents belong.
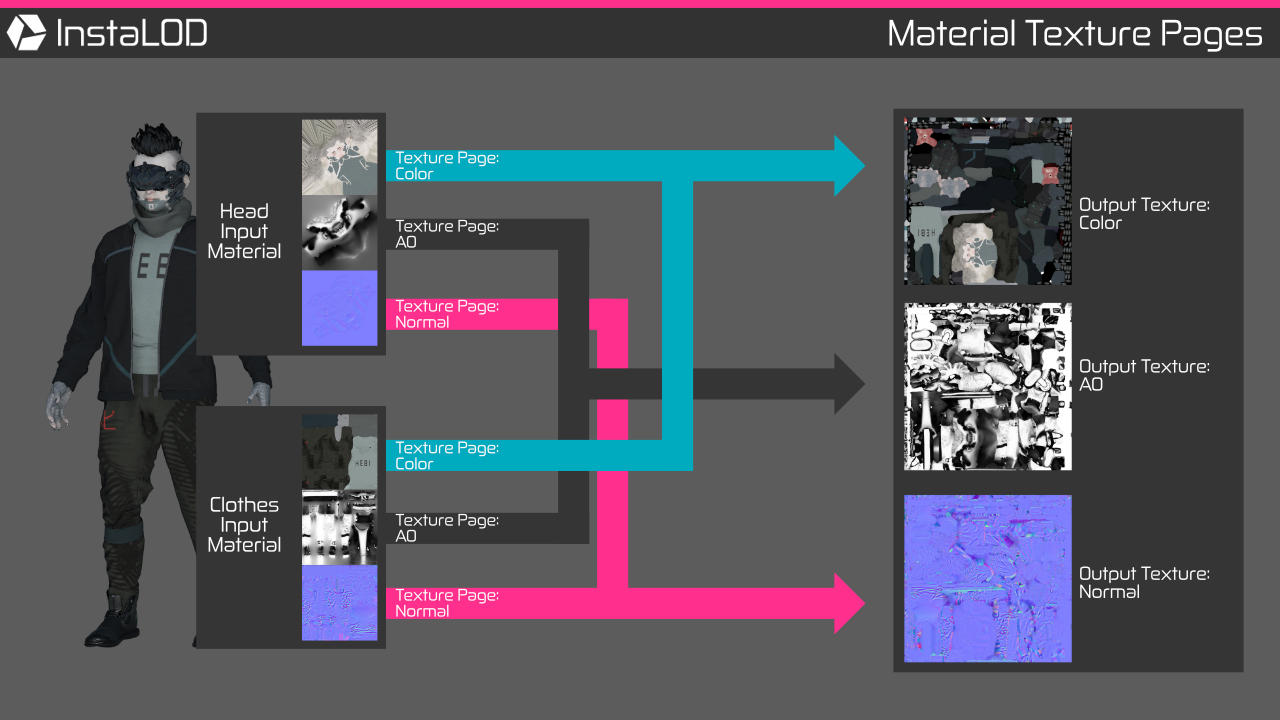
Texture page rules have to be established in order for InstaLOD to understand the semantic of an input texture.
Texture pages with identical names will be written to a single output texture.Additionally, certain texture types like tangent space normal maps or alpha masks can be used by InstaLOD to perform various operations.
When InstaLOD is generating output materials, the texture page's type determines to which material channel it is assigned.
The Materials section of a profile contains all settings relevant to the global material system as used by InstaLOD Pipeline.
| Field | Description |
|---|---|
| OutputPathFormat | (string) The output format string for generated texture files. |
| DefaultWidth | (int) The default output size for texture pages (internal). |
| DefaultHeight | (int) The default output size for texture pages (internal). |
| AutoMatchTexturePages | (bool) Enables to use automatic texture page configurations. |
| AutoMatchTexturePagesForceDefaultOutputSize | (bool) Enables to use default output size for all textures. |
| TexturePageExportFormat8Bit | (string) Output format for 8bit textures (PNG8/PNG8Dithered/PNG16/HDR/EXR16/EXR32). |
| TexturePageExportFormat16Bit | (string) Output format for 16bit textures (PNG8/PNG8Dithered/PNG16/HDR/EXR16/EXR32). |
| TexturePageExportFormat32Bit | (string) Output format for 32bit textures (PNG8/PNG8Dithered/PNG16/HDR/EXR16/EXR32). |
| TexturePages | (array) Array of TexturePage entries. |
Example Materials configuration:
    "Materials" : {
        "OutputPathFormat" : "Build/{MESH.NAME}_{TEXTURE.TYPE}_{INDEX}_{RANDOM}",
        "DefaultWidth" : 2048,
        "DefaultHeight" : 2048,
        "AutoMatchTexturePages" : true,
        "AutoMatchTexturePagesForceDefaultOutputSize" : true,
        "TexturePageExportFormat8Bit" : "PNG8",
        "TexturePageExportFormat16Bit" : "PNG16",
        "TexturePageExportFormat32Bit" : "PNG16",
        "TexturePages" : [ ]
    }
All textures generated by InstaLOD will be written to the file path as configured in the field OutputPathFormat. In order to avoid overwriting the same file for each texture, InstaLOD built-in script variables can be used to construct a unique filename for each texture. Refer to the chapter Format strings with InstaLOD Script variables for an overview over all available variables.
By default, internally generated textures will be created using the size as configured in the fields DefaultWidth and DefaultHeight. Externally loaded textures will use the input texture size as output texture size. However, the output size for both internal and external textures can be manually configured using texture page configurations.
InstaLOD supports high quality texture downsampling and dithering that minimizes banding artefacts when downsampling to lower bit depths.
This is especially useful when downsampling InstaLOD's 16bit normal maps for a rendering engine that only supports 8bit texture data.
To output 16bit textures as 8bit dithered textures, simply set the field
TexturePageExportFormat16BittoPNG8Dithered.
¶ Automatic Texture Page Configurations
Using custom texture page configurations is an excellent way to setup complex rules that integrate perfectly into custom pipelines. However, InstaLOD Pipeline also supports the automatic creation of rules based on the input data when AutoMatchTexturePages is set to true. InstaLOD will then automatically create texture pages for all materials that are attached to a specific material channel (e.g. Color, Normal, etc.).
InstaLOD supports using "Layered Textures" for all material channels to handle even the most complex material setups. When using layered textures, InstaLOD will automatically create a texture page with a name generated based on the material channel type followed by the layer index ex. Color_0, Color_1. When loading Stingray-PBS materials, InstaLOD will automatically generate texture pages for each texture assigned to a PBR texture slot.
To force a common output size for all output textures when using AutoMatchTexturePages, simply set AutoMatchTexturePagesForceDefaultOutputSize to true and the DefaultWidth and DefaultHeight will be used for both internal and external textures.
Automatic texture page configuration is both powerful and flexible and therefore well suited to handle most situations. By default, InstaLOD for Autodesk Maya and InstaLOD for Autodesk 3ds Max use automatic texture configurations to handle mesh materials.
¶ Custom Texture Page Configurations
Custom texture page configurations are a great way to make sure that your file naming conventions are fully recognized by InstaLOD. Texture page configurations work by assigning a texture page to input files that match the regular expression of the texture page.
Texture pages control the type, the pixel specification and dimensions of the texture and whether it is generated or not. By default, the output dimensions match the input dimensions and generation is disabled. If no texture page configuration matches a texture's filename, a default texture page configuration will be created.
Custom texture page configurations can also be used to control the output size of internally generated texture pages. However, the pixel specification of internal texture cannot be modified.
Texture page configurations can be prioritized using the Priority field. A configuration with a high priority overwrites a configuration with a lower priority. InstaLOD regular expressions are case-insensitive and based on the ECMAScript derivate.
¶ Example 1: Color maps
The following configuration matches all filenames that contain one of the following strings: _diffuse, _color, _albedo, -diffuse, -color or -albedo.
If a texture page matches this rule, it will be exported as 8bpp RGB texture.
    {
        "MatchRegExFormat" : "(_|-)(diffuse|color|albedo)",
        "MatchWholeWord" : false,
        "EnableOutput" : true,
        "TexturePageName" : "Color",
        "TexturePageType" : "Color",
        "TexturePageBitDepth" : 8,
        "TexturePagePixelType" : "RGB"
    }
¶ Example 2: Alpha masks
Alpha masks can be used by ray casting operations to allow rays to be cast through a surface. In general, all textures that have an alpha channel can be used as alpha mask. Greyscale textures can only be used as alpha mask if the TexturePageType is set to Opacity.
The following configuration matches all filenames that contain the string: -colormask.png. If a texture page matches this rule, it will be used as alpha mask during ray casting operations and exported as 8bpp RGBA texture.
    {
        "MatchRegExFormat" : "-colormask.png",
        "MatchWholeWord" : false,
        "EnableOutput" : true,
        "TexturePageName" : "Color",
        "TexturePageType" : "Color",
        "UseAsAlphaMask" : true,
        "TexturePagePixelType" : "RGBA",
        "TexturePageBitDepth" : 8,
        "Priority" : 2
    }
If the configurations from Example 1 and Example 2 are used in the same profile, both rules would apply for a filename that ends with the word '-colormask.png', as it would match Example 1's regex rule of '-color' and Example 2's regex rule of '-colormask.png'. However, due to the higher priority of Example 2, it would override Example 1.
¶ Example 3: Input normal maps
A rule needs to be setup for InstaLOD to use normal maps during bake operations. The following configuration matches all filenames that contain the string: _normal.
    {
        "MatchRegExFormat" : "_normal",
        "MatchWholeWord" : false,
        "TexturePageName" : "InputNormalMap",
        "TexturePageType" : "NormalMapTangentSpace",
        "EnableOutput" : false
    }
In most cases
EnableOutputshould be disabled for input normal maps (default), as the baker will export a properly transformed tangent space normal map ifTexturePageNormalTangentSpacehas been enabled in theBakeOutputsettings of the profile. If the output is not disabled, InstaLOD will export the tangent space untransformed.
¶ Example 4: Customizing internal textures
Texture pages can also be used to configure internally generated textures. The following configuration sets the size of the ambient occlusion map to 1024x1024.
    {
        "MatchRegExFormat" : "AmbientOcclusion",
        "MatchWholeWord" : true,
        "EnableOutput" : true,
        "TexturePageType" : "AmbientOcclusion",
        "TexturePageName" : "AmbientOcclusion",
        "OutputWidth" : 1024,
        "OutputHeight" : 1024
    }
Whether InstaLOD generates an internal texture is not determined by texture page rules but by modifying the
BakeOutputsettings of the mesh operation. However, for the size rule to be active,EnableOutputmust be set totrue.
¶ Rendering Normal Maps
InstaLOD is able to generate tangent space normal maps that are compatible with either OpenGL or DirectX. If normal mapped surface details appear inverted, change the value of the TangentSpaceFormat field to either OpenGL or DirectX.
Depending on how your renderer draws normal mapped surfaces, it might be necessary to change ComputeBinormalPerFragment to either true or false. If this setting does not match, surfaces can appear slightly perturbed (Unreal Engine 4: true, Unity: false).
Maya Specific: if color management is enabled, make sure to set the color space of the normal map texture to
Rawor severe rendering artifacts will be present when rendering assRGB. > This issue is unrelated to InstaLOD and applies to all versions of Maya that support color management.Textures assigned to the normal map material channels are imported as
sRGBinstead ofRaw. More information can be found at Autodesk Maya: Troubleshoot Normal Mapping.
¶ Format strings with InstaLOD Script variables
Format strings can be formatted using built-in InstaLOD Script variables. The same placeholders can be used when scripting with InstaLOD Script.
| Token | Description | Example |
|---|---|---|
{YEAR} |
The current year. | 2017 |
{MONTH} |
The current month. | 06 |
{DAY} |
The current day of the month. | 12 |
{INDEX} |
The input file index when queuing folders and batch files. | 3 |
{RANDOM} |
Generates a random integer number. | 1315341 |
{MESH.PATH} |
The file path of the input file. | /Users/InstaLOD/Cmd/ |
{MESH.FILENAME} |
The file name of the input file without file extension. | SM_Sphere |
{MESH.NAME} |
The name of the current mesh in the scene. | Sphere_001 |
{MESH.EXTENSION} |
The input file extension including separator. | .obj |
{PROFILE.NAME} |
The profile used for the current task. | Default |
{TEXTURE.PATH} |
The file path of the texture file. | /Users/InstaLOD/Cmd/ |
{TEXTURE.FILENAME} |
The file name of the texture file without file extension. | T_NormalTangent |
{TEXTURE.EXTENSION} |
The texture file extension including separator. | .png |
{TEXTURE.TYPE} |
The type of the current texture. | Normal |
{MATERIAL.NAME} |
The name of the current material. | M_MetalRust |
The availability and contents of built-in variables is context sensitive. Mesh related variables are typically available when referencing meshes (eg. when formatting output paths or name matching). Material and texture related variables are typically available when referencing textures and materials (eg. when formatting output paths or name matching).
Profile settings that contain the word
Formatdenote a format string. Format strings enable the use of built-in variables.Example: Both
OutputPathFormatandMatchMeshByNameSourceRegExFormatare format strings and therefore allow using built-in variables to construct a string that will be evaluated during runtime.
¶ Using OS Environment Variables
Besides supporting InstaLOD Script variable, format strings can also evalute platform specific environment variables. To include an environment variable in a format string, reference the variable by name using the following syntax on all platforms: ${VARIABLE}. Whenever the string is evaluated by InstaLOD, all environment variables will be evaluated as well.
¶ Program Arguments
The following arguments can be specified when starting InstaLOD Pipeline. It is necessary that at least one profile is specified and one file or batch operation. If no file or batch is specified, a help will be output to the terminal.
-profile <filename>
Loads the profile with the specified filename.
NOTE: Profiles must be specified prior to files or batches.

-profileFolder <path>
Loads all profiles from the specified path.

-file <input filename> <output filename> <profile name>
Queues the specified input file with the specified profile.
The optimized file is written to the specified output file path.
InstaLOD will select the importer/exporter based on the file extension.

-convertfile <input filename> <output filename>
Queues the specified input file for conversion.
InstaLOD will select the importer/exporter based on the output file extension.

-batch <filename>
Loads the specified batch file.

-folder <search path> <file mask> <output format> <profile name>
Searchs the specified folder for files matching the specified file mask.
To search in sub directories append two asterix to the path e.g. "/models/**"
To avoid overriding the same file, the output format should contain format tokens.

-script <filename>
Queues the specified InstaLODScript file for execution.
NOTE: If script files are executed the job queue must be manually started in the script.

-listenScript <filename>
Listens for the specified InstaLODScript file.
If the file is found, it is executed. Afterwards it will be deleted and a <filename>.tick file is generated.
If the file is not found, InstaLOD Pipeline will sleep until the file is available.
NOTE: To abort execution InstaLOD Pipeline has to be forced to quit (CTRL+C)!

-instaOptimize <percentage>
Creates a default profile with the specified reduction in percent [0-100]
and assigns it too all queues files. WARNING: This setting will override any previously set profile.

-threads <count>
Specifies the amount of threads available for optimization operations.

-parallelQueue
Enables parallel processing of the command queue. WARNING: This can significantly increase memory pressure.

-fbxversion <2010/2011/2012/2013/2014/2016/2018>
Specifies the FBX file format version used for FBX exports. Default: 2013

-authorize <email/username> <license/password>
Authorizes this machine for use with InstaLOD Pipeline.
NOTE: Please deauthorize your computer before uninstalling to avoid a locked seat.

-deauthorize <email/username> <license/password>
Deauthorizes this machine.
NOTE: Deauthorization takes 24 hours to complete.

-machineKey
Retrieves the machine specific authorization key.

-authorizeKey <key> <filename> <email/username> <license/password>
Authorizes the machine with the specified key and writes the licensing file to the specified file.

-ingestLicense <filename>
Authorizes this machine using the specified license file.

-licenseInfo
Displays licensing information.

-plugins <path>
Loads InstaLOD SDK plugins from the specified path.

-fbxplugins <path>
Loads custom FBX SDK file-format plugins from the specified path.

-schedule <minute> <hour> <dayOfMonth> <month> <dayOfWeek>
Executes the specified jobs based on the configured cron expression.
InstaLOD Pipeline supports industry standard cron-expressions to easily setup complex schedules.

-watchdog <basePath>(/**) <searchPatternCSV> <outputPathFormat> <outputFilenameFormat> <profile>
Starts as watchdog, tracking the base path for changes. If the base path ends with ** all subfolders will be tracked as well.
-database <databaseFilename>
Specifies a custom filename for the watchdog database, which allows tracking the hierarchy in multiple different watchdog operations.

-master
Starts as a server in InstaLOD Grid Server mode and listens to the port provided by the additional "-bind" argument.

-worker
Starts as a server in InstaLOD Grid Worker mode and listens to the port provided by the additional "-bind" argument.

-bind <hostname:port>
Binds network activity to the specified address and port.

-register <hostname:port>
Registers an InstaLOD Grid Worker with an InstaLOD Grid Server under the specified address and port.

-server <hostname:port> <username> <password>
Connects to the specified InstaLOD Grid server for remote data processing.

-disableTextureUpload
When using the "Client" mode, instructs InstaLOD not to upload any texture files to the server.

-service register <servicename> <domainname\username> <password>
Registers a service with the specified name and the specified user credentials.
-logFile <filepath>
Can be used in conjunction with the "-service register" argument to write the InstaLOD Pipeline output to a file.

-service unregister <servicename>
Unregisters a service with the specified name.
Use "-service unregister all" to unregister all services at once.

-service updatepassword <servicename> <domainname\username> <newpassword>
Updates the password for the specified service.

-service list
Lists all currently registered services.

-pythonFolder <sourcePath>
Registers a Python source folder. All Python source files in the folder and subdirectories will be loaded into the Python VM.
NOTE: This requires the availability of the Python Plugin in the current environment.
¶ Available Import/Export File Formats
InstaLOD Pipeline supports more than 50 distinct file import formats and more than 10 export file formats. The following file formats can be loaded by InstaLOD Pipeline among many more. InstaLOD will automatically detect the file format based on the file extensions and file header:
- FBX (*.fbx)
- Universal Scene Description (*.usd, *.usda, *.usdc, *.usdz)
- Alias OBJ (*.obj)
- GL Transmission Format (*.gltf)
- Collada DAE (*.dae)
- (*.zip)
For a full overview of all supported file formats, please use the "-help" argument or refer to our Knowledge Base:
It is highly recommended to use FBX for both import and export as it is the only file format for 3D data that supports storing important data points such as animations, skeleton, normal, binormals, tangents, smoothing groups as well as embedding of texture data.
¶ File Conversion
InstaLOD Pipeline is able to convert 3D mesh files, using the -convertfile argument, from one file format into another. If the input mesh is a CAD file, the output will be tessellated with InstaLOD's default settings.
Files can be converted with the -convertfile argument followed by the file name of the input mesh, then the file name of the output mesh:
-convertfile <input filename> <output filename>
InstaLOD will select the importer/exporter based on the output file extension.
The following command converts a STEP file into an OBJ:
InstaLODCmd -convertfile "MyFile.stp" "OutputFile.obj"
For additional control over CAD file tessellation, a profile must be created. For more information on working with CAD data and tessellation, please read our dedicated articles on best practices for optimizing CAD data and how to selectively tessellate CAD data.
¶ Adding Custom File Format Support via Plug-ins
InstaLOD Pipeline allows developers to extend the file format import/export capabilities via plug-ins loaded at runtime. Plug-ins can implement both custom readers and writers. To load plug-ins specify the -plugins <path> argument when invoking InstaLOD Pipeline from the command line.
More information on InstaLOD plugins can be found in the documentation shipped with InstaLOD SDK.
More information on customizing file formats with FBX SDK I/O plug-ins is available online.
It is important to build and link your FBX SDK plug-in to the corresponding FBX SDK version used by InstaLOD Pipeline. The current FBX SDK version is output when using the "-help" argument.
¶ Third Party Components
For information on additional third-party components licensed by InstaLOD, the InstaLOD SDK or InstaLOD Pipeline visit http://www.InstaLOD.com/FOSS.
¶ Website
Please visit http://www.InstaLOD.com to stay up to date!
Thank you for using InstaLOD.